
AC 1.1: Identify and assess contexts and approaches to photography
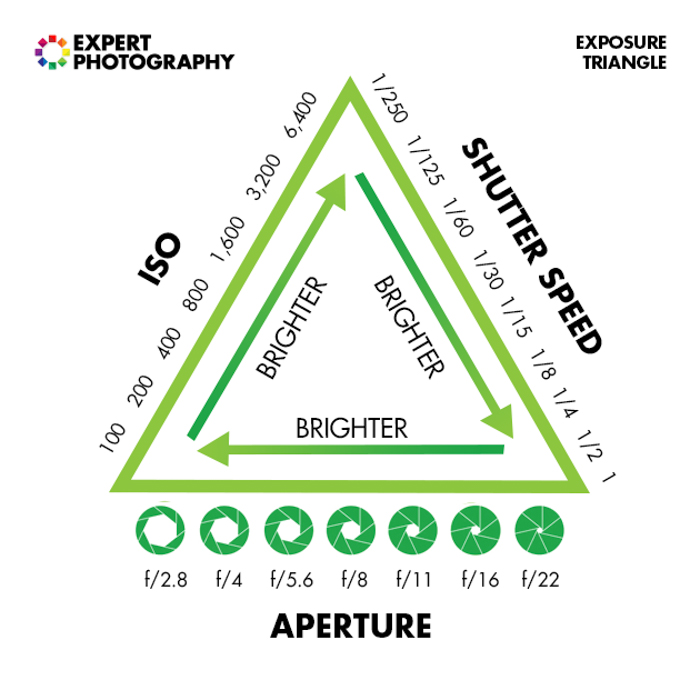
In this project we focus on showing the use of depth
of field and of long exposure in different shots. While doing this we make sure
to understand the importance of the Exposure Triangle and how it can affect
your shots.
For my tasks, I wanted to try things out of “my confort
zone” while shooting (I love to shoot architecture and landscapes in a very sharp
way, no people in sight or portraits). Playing with the long exposure and with
the deph of field was a nice experience to know more about my camera and
equiptment and to see a new side of myself throught the lens.
We learnt about Michael Freeman and his ten different
types of shadows. Coming myself for an art background was a nice experience to
see it with his eyes.
As I stated before I love clean and sharp photos, but
learning more about shadows with the Freeman guide was quite and experience and
it really pushed me to try to see if I can shot one of each. After this course
I feel that now I’m in control with my camera and helped me to feel more
confident while shooting outside with people around me.
Task 1: Depth of Field, Selective focus (AC 2.1, 2.2, 3.2)
Present a series of 3 images in response
to the title using the depth of field and/or selective focus.
Image 1

Canon PowerShot G7X Mark II 1/25s, f/2.8, ISO 800 27mm
One of the things I love to photograph is my cat Cleo. She loves my monsteras plants and enjoys playing hide and seek with them. She was playing with the leaves when she sat still and I shot a couple of nice photos of her.
The light in this photo comes from the window behind her back and touches slightly the leave. I was sitting still while I took this shot as I didn't have my tripod with me. I focus the camera on the leaf to produce a soft Bokeh effect in it. While you can still see Cleo, you can tell that she is a bit blur.
Image 2

Canon PowerShot G7X Mark II 1/1000s, f/4, ISO 125, 280mm
This one is one of my favourite shots during spring time. I went for a nice walk with some friends, cameras on hand and we saw this beautiful tree blooming.
I like how the Bokeh effect is reflected on the shot while you can see the open shadow difference on the tree at the back. It was a windy day so I believe it helped with the blur on the shot.
Image 3

Canon EOS 250D 1/80s, f/4.5, ISO 100, 34mm
Cleo is one of my muse ( I got two cats) and when I saw her sitting at my window I could not let the shot to go away. As the sunset came and the light went down on that cloudy day I use my AP to get this beautiful shot of Cleo with Kingston University on the background. The Bokeh effect on this photo is one of my favourites I shot.
Task 2: Shutter Speed (AC 2.1, 2.2, 3.2)
Task 2: Present a series of 3 images in
response to the title using slow or fast shutter speed techniques. Techniques
to consider: Multiple exposure, Movement or Painting with Light.
For this exercise I decided to use the long exposure technique to
create a light trail at night and I wanted to see the effect that can happened during daylight. I used my tripod to have the photos as still as I could.
Image 1

Canon EOS 250D 30s, f/25, ISO 100, 25mm
I took this image in the evening on a footpath bridge. I set up my tripod to capture the trail lights but I decided to twist the lens to get this effect of the lights crossing each other (it was a straight road). I'm really happy how this experiment turn out. I learnt that for more trails I want to shoot in places with more "street lamp".
Image 2

Canon EOS 250D 0.8s, f/29, ISO 100, 46mm
I took this image at the Kingston College roundabout just before sunset. I set up my tripod and I waited for the buses to come and turn on the roundabout to try to catch this ghost effect. At the beginning I started with a quick Shutter Speed (less than a second) to see how it will affect the shot manteining the ISO at a 100.
Image 3

Canon EOS 250D 1s, f/29, ISO 100, 30mm
For this image I decided to set the shutter speed on a second. Because it was at sunset time there are no really visible shadows but I did learn a lot about this experiment of shooting vehicles during daylight. What I like from this shot is that you can still see the art piece from the roundabout where the bus is. We can see this because of the "ghost" effect that produces.
Task 3: Final take (AC 3.1, 3.2)
Present a series of 5 images in response
to the title using photographic techniques chosen by you. You can use any
techniques you are familiar with. You can research and apply in and off camera
manipulation.
Image 1

Canon PowerShot G7X Mark II 1/30s, f/1.8, ISO 400, 9mm
I took this photo while I was at a Zoom lesson. One of the things I learnt during this course is that we were two taking it. This shot is a great example of the Bokeh Effect on the background while Cleo is the main subject of the photo. The light came from the laptop making her fur to have different shadows on her left side.
Image 2

Canon PowerShot G7X Mark II 1/1250s, f/2, ISO 125, 9mm
I took this shot while walking around Kingston upon Thames. This beautiful art piece from David Mach is a good example of repetition and Aperture Priority making the background blur. You can also can appreciate the shadows at the bottom of the phone boxes very subtle.
Image 3

Canon PowerShot G7X Mark II 1/1250s, f/6.3, ISO 125, 18mm
The calm before the storm, I shot this from my window before the storm came. I like how the blue sky is frame in between the dark clouds and Kingston Uni. With this shot I was trying to catch different types of shadows, as Michael Freeman show us before.
Image 4

Canon PowerShot G7X Mark II 1/30s, f/2, ISO 125, 9mm
Happy birthday! As the previous photo I was testing and trying to get different types of shadows as Michael Freeman talked about. In this case I was trying to get a "receding shadow" and I think I manage to capture it with this shot. All the lights were turn off and the only light source were the candles on top of the cake. As they are on the left side you can see more of the table while on the right side everything is on shadows. I also love how the candle lights hit the skeleton decor on the cake making more shadows in it.
Image 5

Canon EOS 250D 13s, f/7.1, ISO 100, 50mm
I shot this picture at class while one of my classmates was posing as a model. I was trying different Shutter Speeds and in this one in particular I decided to move the camera while shooting it. I used my 50mm lens so I moved the camera upside down to gain this effect on the shot. It was a really interesting experience as I was testing that lens properly for the first time.
Safe Working Practices (AC 4.1)
The first safe working practice that I needed to be aware of is myself. As a disabled person I always need to make sure that I don't compromise my safety for a shot. While I take photos at night I always take in consideration a couple of things. If there is traffic I either stand on the side, away from the road (in case I have a seizure I'm not at risk), or I choose a place with no traffic. When I choose the busy roads I always check if I can take it from above like in a footpath bridge or I wear a Hi-Vis so I'm visible to the traffic coming my way.
When I shot on a pedestrian road I'm always aware if I need to move out of the way of other pedestrians or if a vehiacle needs to pass next to me. I always make sure that while I'm out shooting to carry my ID's, emergency contacts and medical info in case of need.
I always make sure to ask for permission while shooting and to no trespass on private lands.
Declaration
‘I confirm that the attached portfolio is all my own work and does not include any work completed by anyone other than myself.'
Barbara Carozzi Bermejo


0 comments:
Publicar un comentario